
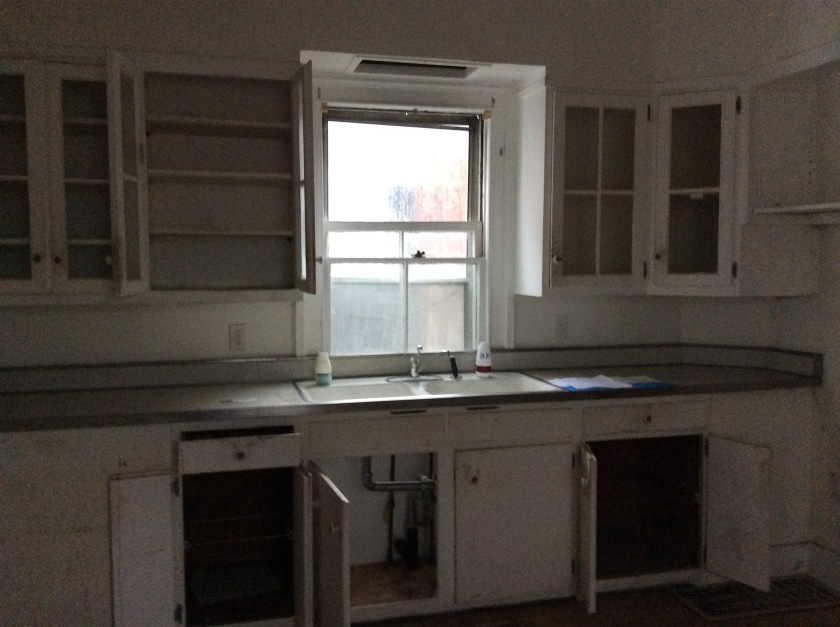
As you may remember from previous posts, one of the big projects we are facing in the house is a full kitchen renovation. We’ve been futzing around with Steve’s floor plan app, trying to see what we could come up with ourselves, with some ideas and inspiration from my parents. So far, this is what we came up with.
This weekend, our goal was to finalize our floor plan design, since next weekend we will be demo’ing the kitchen, a thought that is both scary and exciting.
Normally we head up to Poughkeepsie on Friday night after work/dinner, so that we can get a bright and early start on Saturday morning. (And yes, I am continuing to keep up my tradition of waking up at 6:00 to start working on the weekends.) This weekend we had to do things a little differently. One of our cats is recovering from oral surgery (ouch!) and needs a special diet and pain medication, which meant we needed to feed and medicate him on Saturday morning. It did leave more time to sit in the apartment, painting porch posts.
So, instead we woke up at 6:00 in NYC, rushed around finalizing our packing, getting ready, dosing the cat, and getting our car out of the parking garage. By 7:30 we were on the road. It’s nice to drive up to PoK on an early weekend morning. We’re pretty much the only people on the road….so much for the saying about NYC being the “city that never sleeps.” The dawn over the mountains in the Hudson Valley reminds us why we decided to move up there in the first place. And inside the car, we are abuzz with dreams, ideas, plans, and energy for the day ahead.
On Saturday morning, we had a 9:00 appointment with one of our two potential kitchen designers. I know–it’s pretty fancy of us to have not one, but two home designers. I never thought we would be the type of people to hire designers! The Saturday morning appointment was with the lady who wasn’t very enthusiastic when she visited our home to look at the kitchen and take measurements. It felt pretty obvious to us that she thought of the project as just a job, and not a particularly exciting one either. She didn’t say much, didn’t ask much, and her face seemed to say “what IS this place?” Which, to be fair, is probably the emotion many of you might have if you stepped foot inside the first floor of our house in its current state.
At 9:00 sharp we pulled into the parking lot of the local hardware store where she is located. When we sat down with her, she pulled out her drawing of our kitchen, and we quickly realized that she hadn’t actually done any kitchen design work yet. Hmmmm. The other lady had already sent us her best ideas for a kitchen layout. Another reason to be skeptical. But I will say, this lady was much more enthusiastic and even happy when we were in her office. So we tried to stay enthusiastic and engaged too, because…you never know.
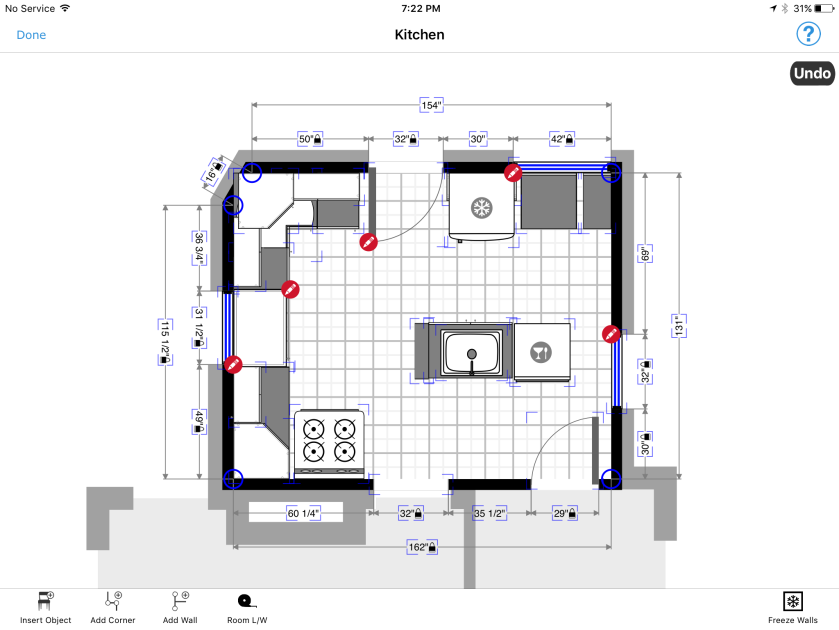
As we talked through the challenges of the kitchen, a floor plan began to emerge. She designed on the spot, using CAD software and a computer that had two screens, one for her and one facing us across her desk so we could see what she was doing as she was designing. We talked, we walked around her kitchen design showroom, getting ideas and inspiration, and we drew. Or rather, she drew, while we sat there. At one point we decided Steve should go ahead to Home Depot to pick up this weekend’s resources, since the ideas were captured and the drawing of the plan was taking so long. He had time to go to the other hardware store (where they have some items that are not in stock at the smaller family-run store we were in), then buy materials and drive back all while I was still sitting with the designer, talking through the minutiae of how to construct our kitchen.
I will say, the longer we talked about the floor plan she was designing, the more excited I became. In Steve’s words, the floor plan was “audacious.” It definitely made a statement. She recommended solving our lack of wall for kitchen counters by building a peninsula–basically, a kitchen island connected to a wall. In this case, it would be connected to our back wall. Steve added the idea of putting in uppers above the peninsula to give us plenty of storage space. We talked through the pros and cons of a wall to ceiling “pantry” shelving system. We talked through fridge widths. We talked about sink sizes and how to best keep the flow of traffic in the kitchen moving. And she drew and measured and drew some more and moved things over an inch to stay away from the 25 miles of trim around every opening in the kitchen.
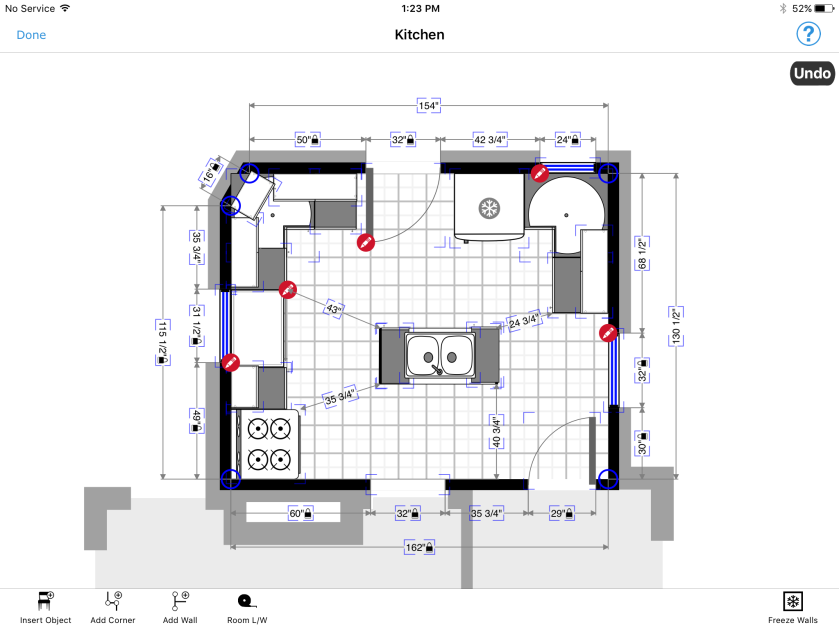
Two and a half hours later, we had it. A fully-designed kitchen rendered in 3D. See what you think.
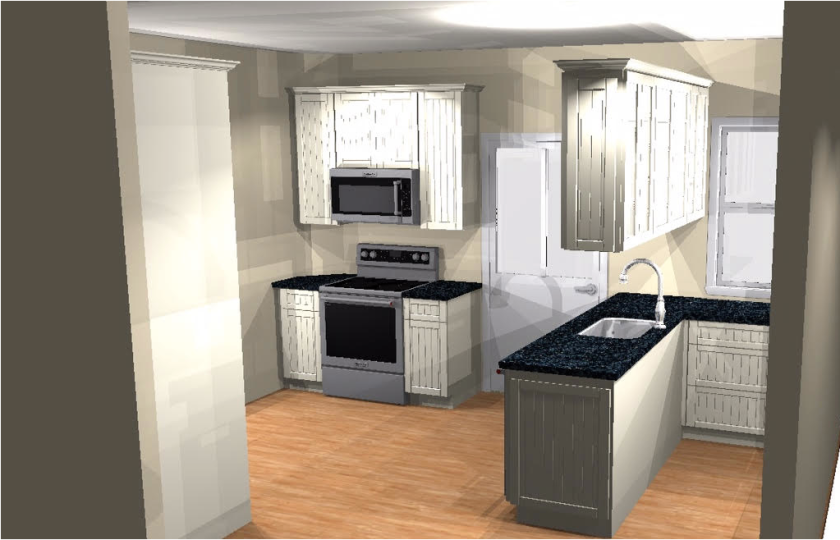
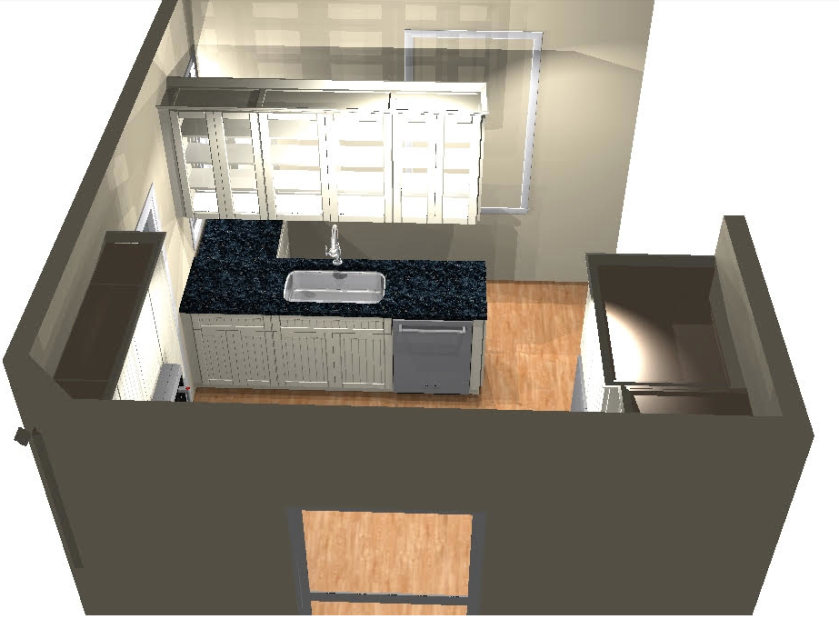
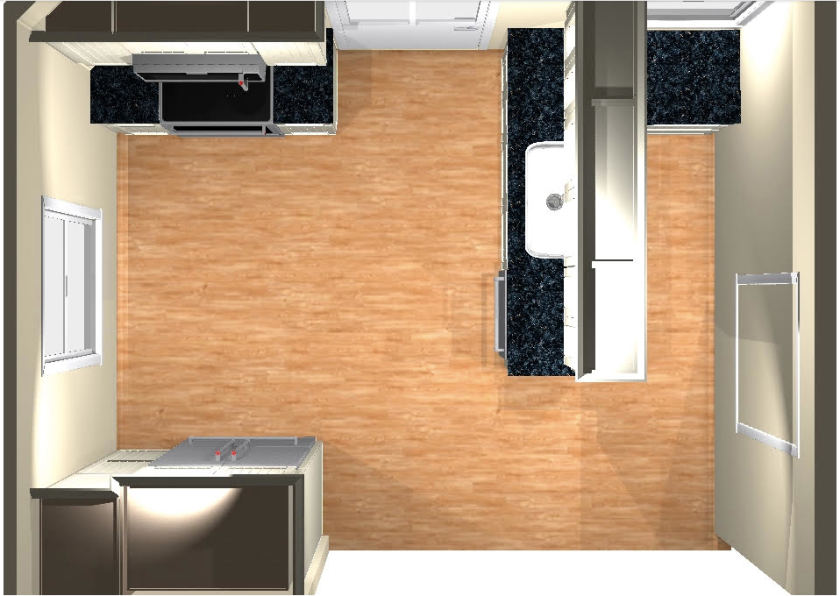
We really liked this floor plan and some of the special treatments of the kitchen cabinets (pull out drawers to make it easier to access pots and pans!). We couldn’t imagine that the other designer could come up with anything better, so we figured this would be our kitchen plan.
As we entered the house we migrated to the kitchen to imagine the floor plan in its live space. We were a little nervous about the upper cabinets making it feel like another wall was being added, but we figured that having them with glass doors on both sides would leave it open and airy enough to make it work.
Since the kitchen design appointment took much longer than we anticipated, and since we didn’t get our normal 6:00 AM start, we hustled to make the most of the day that we had still available for us. Today was scheduled to be front porch day. We couldn’t have selected a better weekend for it! Even though it is August, which is the hottest month in our area, the weather was a picture-perfect 74 with a high breeze. I was a little sorry that I packed work shorts instead of work jeans.
Our front porch goal for the weekend was to install new treads on the front porch stairs. When we originally purchased the house, the porch treads were too weathered to repair. So, we replaced them with wood that took me about two weekends to get into condition–sanding, wood filling, priming, and painting. Here’s what they looked like when we first installed them.
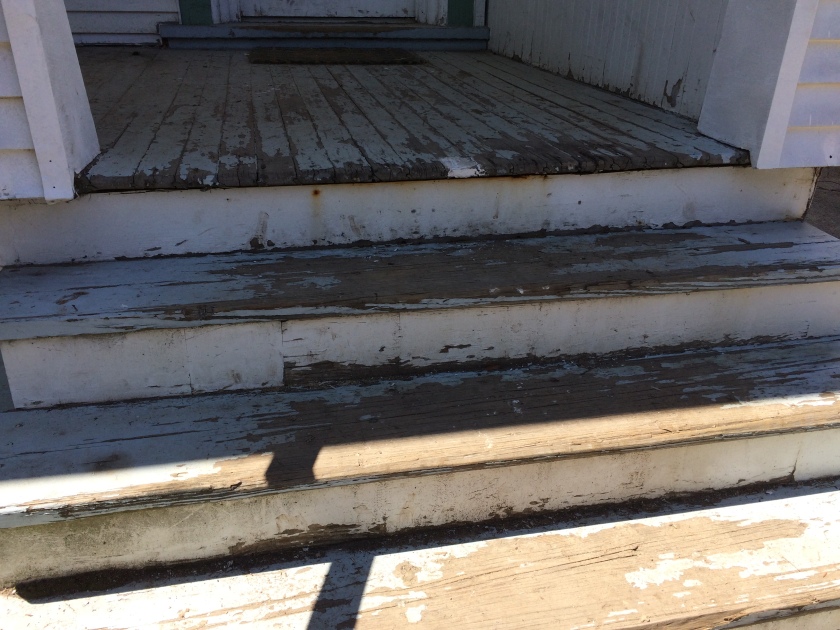

A few weeks later, and one of them began to crack. A couple weeks after that and another one began pulling away from the staircase. We talked to the hardware store people who told us that when you buy wood that size for an outdoor installation, it must be cut in half horizontally to allow the wood to expand and contract with the weather. Also, they recommended using pressure-treated wood. So, we bought pressure-treated wood and set it in the basement to dry out for preparation for installation.
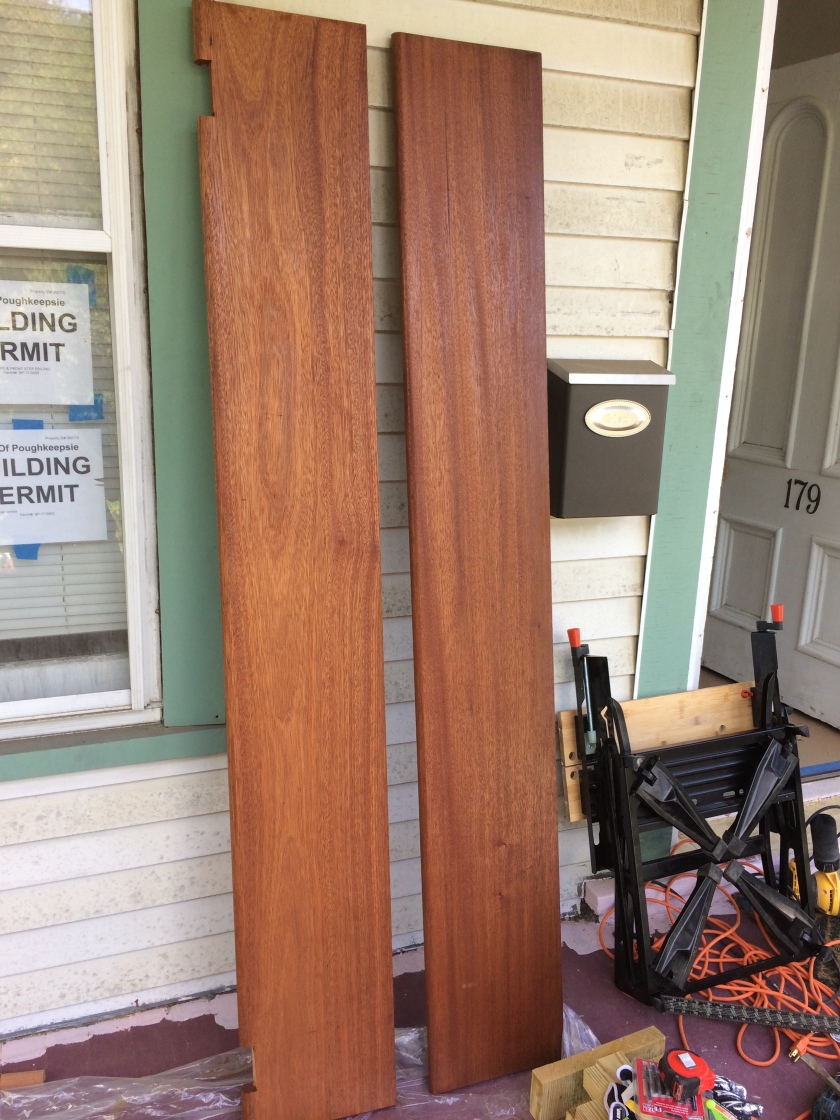
Then, when Jason (our carpenter neighbor) came to our house, we talked through our problem, and he recommended using mahogany instead, for durability and aesthetics. So, we decided to ditch our pressure-treated wood and buy a THIRD set of wood for the front porch stairs. We’ll figure out a different use for the pressure-treated wood.
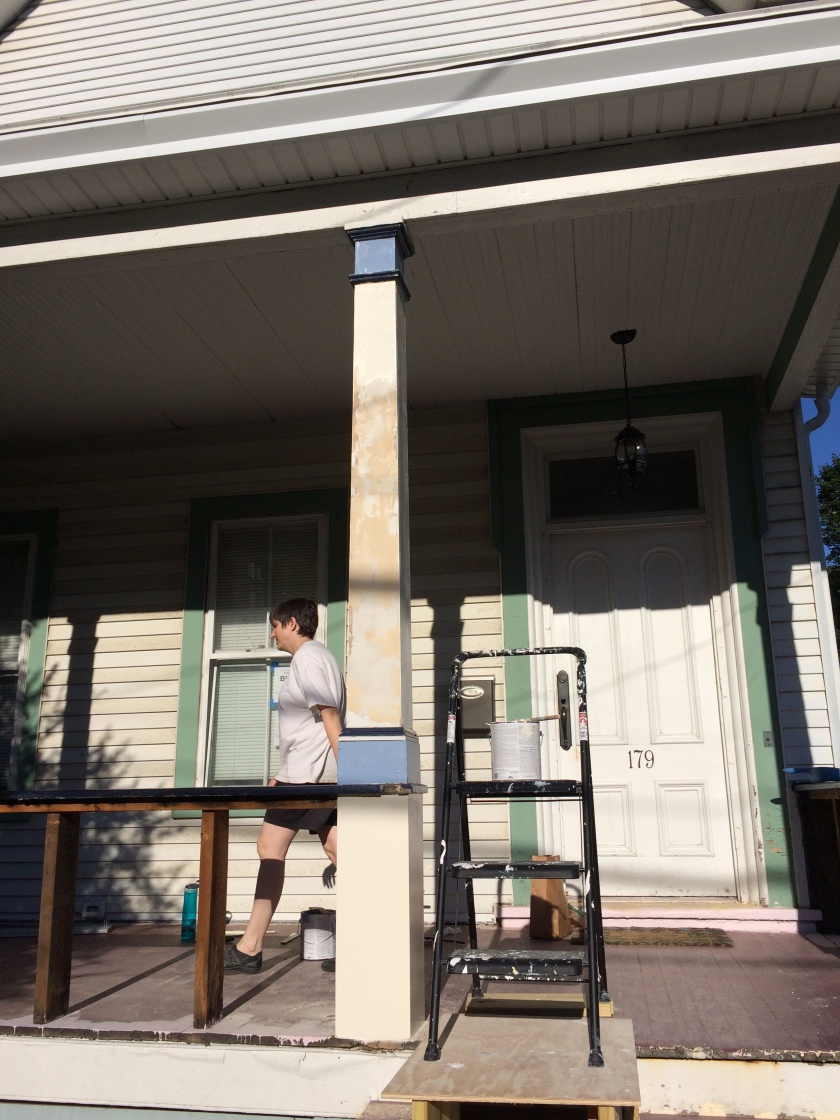
Our wood finish (recommended by Jason) arrived from Amazon this week, so it was time to install the treads. While Steve carefully measured and prepared to cut the mahogany to size, I worked on scraping down old paint from the porch railing and one porch post.
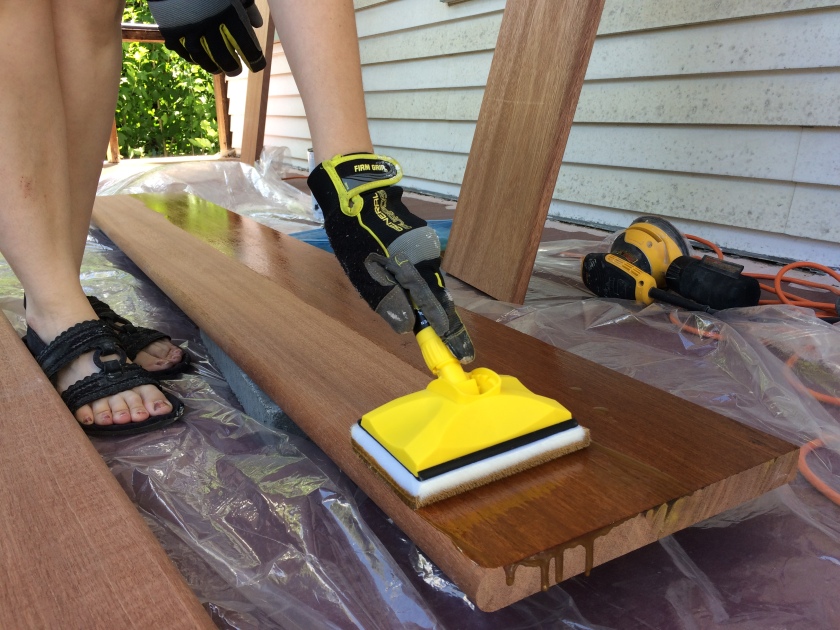
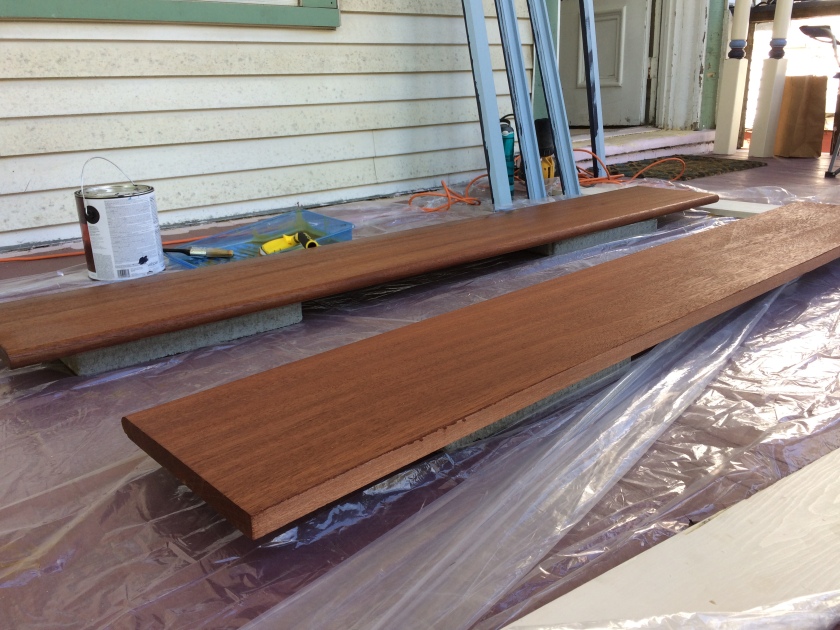
Then, it was time. Steve boldly made cuts in the mahogany and was rewarded for his painstaking measurement efforts by a perfectly cut mahogany tread. Time to stain it. We are using Australian timber oil rather than traditional stain and polyurethane. The timber oil is supposed to be more durable for the outdoor weather and also doesn’t give the wood that plastic feel that you get with polyurethane. It lets the natural grain of the wood shine through and doesn’t add much artificial color.
Time to don my heavy-duty respirator and get to work. I practiced applying the timber oil on the discarded piece of mahogany first, just to see whether I’d need even more practice before applying to our real stair tread.
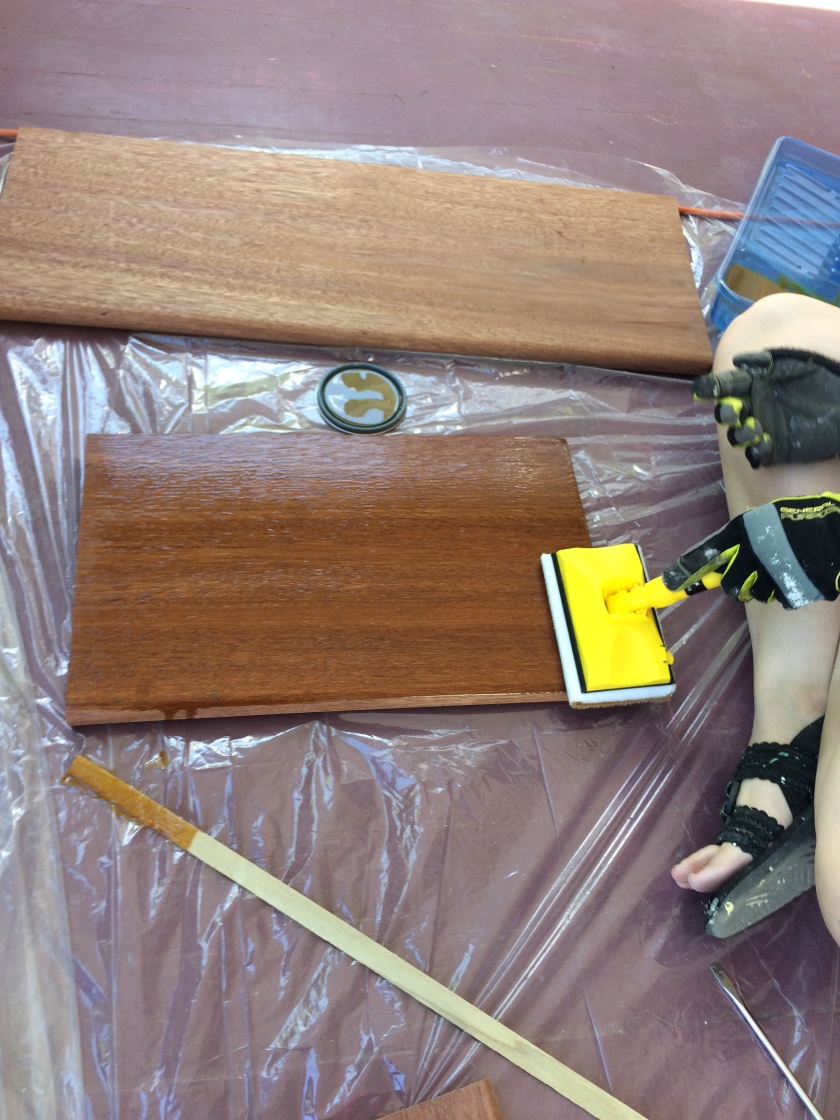
But, it was actually pretty easy to apply, so I moved to the actual tread and began applying. Steve and I were immediately pleased with the results. And our neighbor, from the Mary Poppins house next door, stopped over to share in the enthusiasm. I REALLY like this neighbor; he always stops by to check in on us and always offers his honest input and ideas.
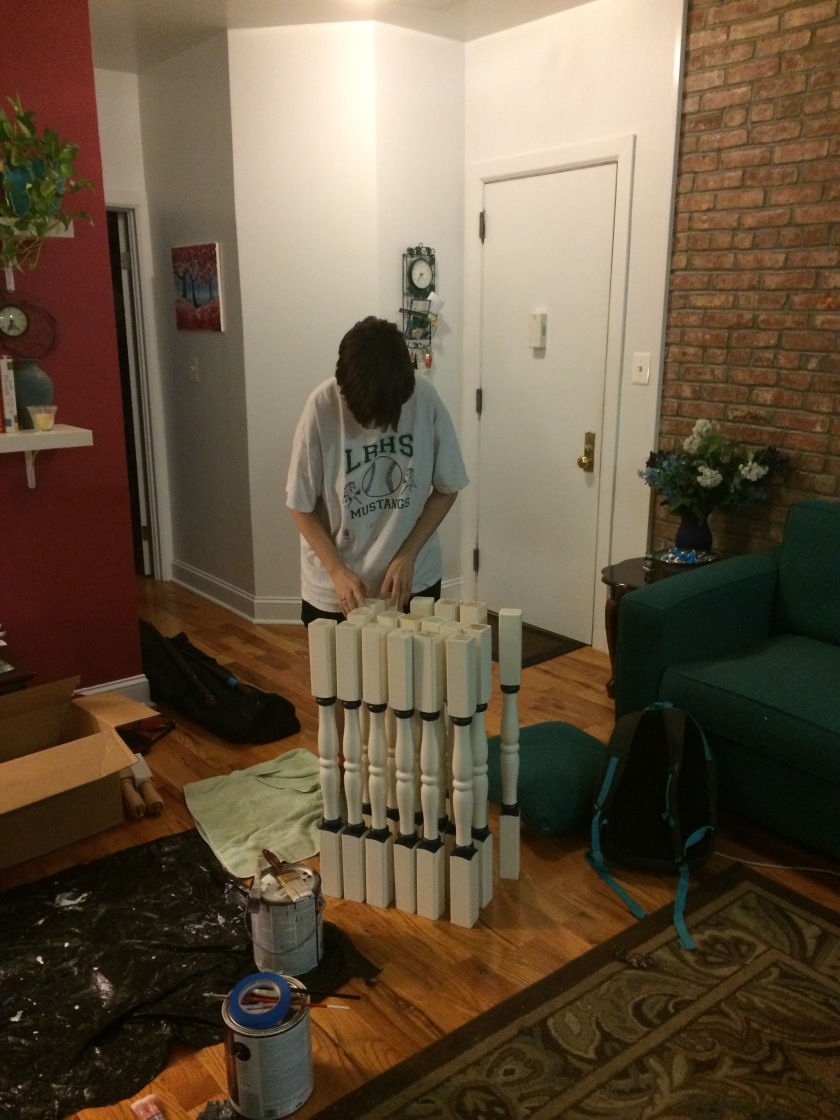
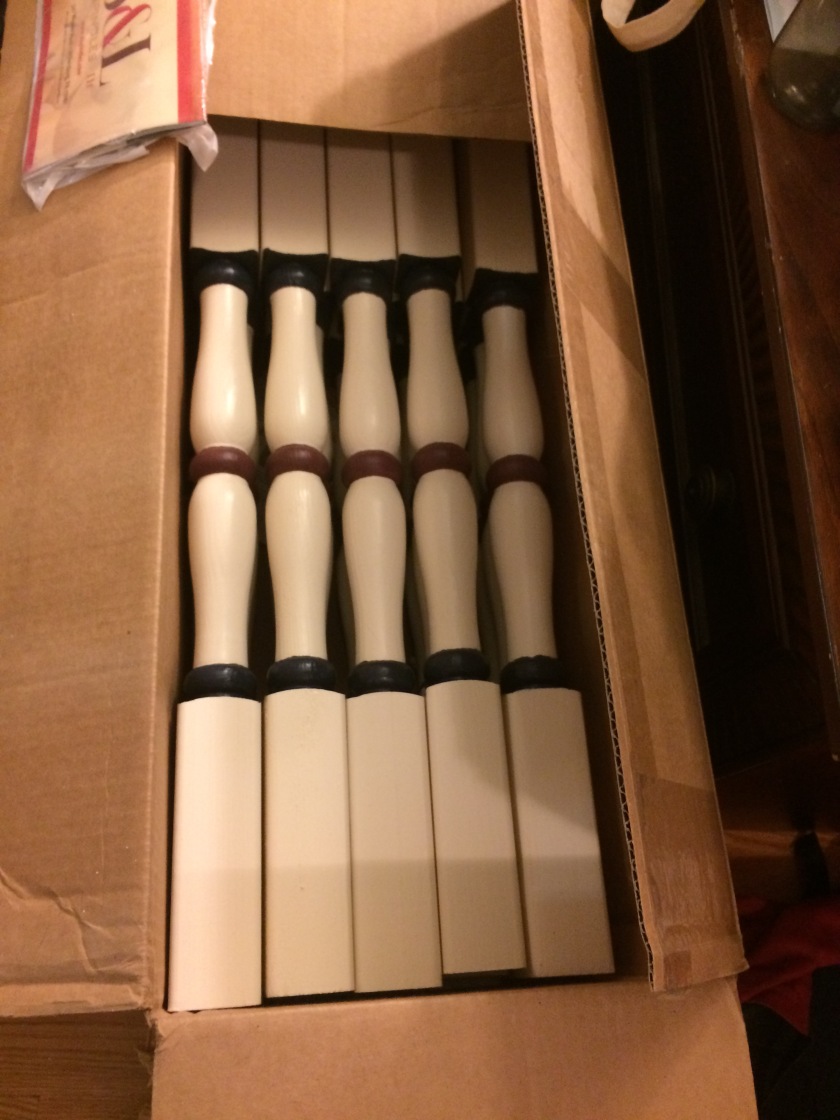
After Steve finished cutting all the mahogany, he headed upstairs to prime and paint the master bedroom ceiling. Meanwhile, I stayed downstairs, scraping peeling paint off one of our front porch posts and then adding wood fill to smooth out the gaps in the peeled paint. I also finished painting the lower posts that Steve installed a few weeks ago.
At dinner time, we had a dilemma: last weekend Steve found a Yelp review for a great little restaurant on the other side of the Hudson River that had lovely sounding farm-to-table menu items. But, with our crunched timeframe today, did it really make sense to take that much time for dinner?
Since Steve brought nice clothes for dinner and had been looking forward to the restaurant all week, we decided to sacrifice the time to enjoy an actual date night meal. We cleaned up and headed across the river for dinner.
We were not sorry. We ended up eating outside, where we were joined by all manner of fowl: three kinds of ducks, two kinds of geese, and even some swans! The meal was delicious and fresh, although it did kill two hours of our work time when all was said and done.


Back at the ranch, I finished applying wood fill by the light of the moon while Steve painted the bedroom ceiling and began the laborious process of assembling and installing the ceiling fan. The weather was crisp, and it felt soooooooooo good to be working on another part of the porch. We were hoping to get the porch posts done this weekend so that next weekend, when my parents are in town, we would be able to get all the way done with the front porch. Doesn’t look like that will happen given the short amount of time we had this weekend, but at least I could finish one post!
True to form, the next morning I was up at the crack of dawn. PAINTING PARTY!!!! After a quick oatmeal breakfast, I headed outside in the chilly 68 degree air. Why did I only bring shorts?! I opened up three different colors of paint: light blue, dark blue, and off-white, and set to work Victorianizing our front porch post. Meanwhile, Steve worked through the process of installing the new mahogany treads, very, very carefully. This time, instead of screwing them in through the top of the tread into the stringer (the side part of the stairs), he went in underneath with brackets so that the top of the mahogany would be perfectly smooth.
We worked as quickly as we could, installing treads, painting the post, then cleaning up the house, since we had our second kitchen appointment of the weekend, with the other designer who was more excited when she visited our house.


Despite our best efforts, it took longer than anticipated to finish these morning tasks. Being late for anything is by far my very, very least favorite thing, so I was a big ball of stress as we wrapped up at the house and quickly drove to her show room.
As we sat down with Kimberly, we were reminded again about why we enjoyed her so much when she visited with us at our house. She was confident in her work, happy to be working with us, flexible in her ideas, and down-to-earth. We talked through the floor plan she sent us originally and compared it to what Steve had designed. We were a little concerned with her original plan because it didn’t give us much cabinet space and had lots of dead areas. But working together with Steve’s plan and her plan, a new, more improved plan began to emerge. Back came the island. The fridge moved over and got narrower. A lazy Susan for the tricky lower cabinet by the oven.
In the middle of our conversation, the owner of the kitchen design store popped over. He’s friends with Jason, our carpenter neighbor, and expressed enthusiasm for Jason, and for all people who are passionate about home renovation. He was grateful for our business and eager for us to look around his showroom. They were both just very, very kind people.
When all was said and done, we had another floor plan to review, some ideas about cabinet styles and flooring finishes, and we were on the road home to care for our sick cat.
And we were stuck. Which kitchen design should we choose? Both had merits. The first plan felt like a cozy workspace kitchen with lots and lots of cool features. The second plan felt spacious and practical.
Time to call in the reinforcements! We called my parents to talk through both ideas. My dad’s advice: your house is a machine for living–it should be as efficient and practical for what you want to do as possible. Aesthetics are important, but practical use is MOST important.
After thinking and talking the whole drive home, we decided to go with the second floor plan. Do you think we made the right choice?

Love the treads!
I like the second. You never want to feel like you’re in a cave. Especially with so many awkwardly placed great windows to use! Even with the glass cabinet doors, the first plan looked a bit cramped. The second one having an island will be more open and easy to navigate around the full kitchen. Not blocking you in anywhere. 🙂 I love it!!
LikeLike
That’s a really good point about the windows, Jess. I mean, if we go to the trouble to save the original windows, we shouldn’t be covering them up. 🙂
LikeLike
Yay! A kitchen is beginning to emerge! The house is happy and feels like it can breathe again. You are doing a great job.
LikeLike
I was thinking that too, about the house feeling good that we are caring for it. Can’t wait to see you sooN!
LikeLike
You made the right choice for your kitchen . Porch stairs look great .good job. Mom and dad.
LikeLike
Thanks for voting and for reading along. We’re glad you agree with the decision too!
LikeLike
YES! The second design is my favorite. You’re doing an amazing job. I love following your blog. I’m an HGTV addict too so I always look forward to an update! Happy remodeling Steve and April.
LikeLike
Thanks for voting along with us, Donna! It feels good to know that others think we made the right decision too. We love the HGTV shows too. We joke that if there were a show about our renovation, it would be a comedy. 🙂
LikeLike